
文章目录
- 1 Securing Email Server Traffic with TLS Certificate
- 2 Obtaining TLS Certificate with Apache Web Server
- 3 Obtaining TLS Certificate with Nginx Web Server
- 4 Configuring Postfix
- 5 Installing Dovecot IMAP Server
- 6 Configuring Dovecot
- 7 Configuring Mailbox Location
- 8 Configuring Authentication Mechanism
- 9 Configuring SSL/TLS Encryption
- 10 SASL Authentication Between Postfix and Dovecot
- 11 Auto-create Sent and Trash Folder
- 12 Configure Desktop Email Client
- 13 Using Dovecot to Deliver Email to Message Store
- 14 Wrapping Up
This is part 2 of building your own secure email server on Ubuntu tutorial series. In part 1, we showed you how to set up a basic Postfix SMTP server, In this tutorial, we are going to configure our email server so that we can receive and send emails using a desktop email client like Mozilla Thunderbird or Geary.
To be able to send email using desktop email client, we need to do a little bit configuration on Postfix. To receive email using desktop email client, we can install an open source IMAP server named Dovecot on Ubuntu 16.04 or 14.04 server. And to encrypt our communications, we need a TLS certificate.
Securing Email Server Traffic with TLS Certificate
Please note that when we configure our desktop email client, using encryption is always a good idea. We can easily obtain a free TLS certificate from Let’s Encrypt. Issue the following commands to install Let’s Encrypt client (certbot) on Ubuntu 16.04 server from official PPA.
|
1 2 3 4 |
sudo apt install software-properties-common sudo add-apt-repository ppa:certbot/certbot sudo apt update sudo apt install certbot |
If you don’t have a web server running yet, I recommend you install one (Apache or Nginx), because it’s easier to obtain and install TLS certificate with a web server than using other methods. And in a later tutorial, I will show you how to set up webmail, which requires running a web server.
If you use Apache web server, you need to install the Apache plugin. (The following command will install Apache web server if it’s not already on your system.)
|
1 |
sudo apt install python3-certbot-apache |
If you use Nginx web server, then install the Nginx plugin. (The following command will install Nginx web server if it’s not already on your system.)
|
1 |
sudo apt install python3-certbot-nginx |
Obtaining TLS Certificate with Apache Web Server
You need to have an Apache virtual host for mail.your-domain.com before obtaining Let’s Encrypt TLS certificate. Create the virtual host file:
|
1 |
sudo nano /etc/apache2/sites-available/mail.your-domain.com.conf |
Then paste the following text into the file.
|
1 2 3 4 5 |
<VirtualHost *:80> ServerName mail.your-domain.com DocumentRoot /var/www/mail.your-domain.com </VirtualHost> |
Save and close the file. Then create the web root directory.
|
1 |
sudo mkdir /var/www/mail.your-domain.com |
Set www-data (Apache user) as the owner of the web root.
|
1 |
sudo chown www-data:www-data /var/www/mail.your-domain.com -R |
Enable this virtual host.
|
1 |
sudo a2ensite mail.your-domain.com.conf |
Reload Apache for the changes to take effect.
|
1 |
sudo systemctl reload apache2 |
Once virtual host is created and enabled, run the following command to obtain and install Let’s Encrypt TLS certificate.
|
1 |
sudo certbot --apache --agree-tos --redirect --hsts --email your-email-address -d mail.your-domain.com |
Substitute the red text with your actual data. You should see the following which means the certificate is successfully obtained. You can also see the directory under which your cert is stored.

Obtaining TLS Certificate with Nginx Web Server
You need to have a Nginx virtual host for mail.your-domain.com before obtaining Let’s Encrypt TLS certificate. Create the virtual host file:
|
1 |
sudo nano /etc/nginx/conf.d/mail.your-domain.com.conf |
Next, paste the following text into the file.
|
1 2 3 4 5 6 7 8 9 10 |
server { listen 80; server_name mail.your-domain.com; root /var/www/mail.your-domain.com/; location ~ /.well-known/acme-challenge { allow all; } } |
Save and close the file. Then create the web root directory.
|
1 |
sudo mkdir /var/www/mail.your-domain.com/ |
Set www-data (Nginx user) as the owner of the web root.
|
1 |
sudo chown www-data:www-data /var/www/mail.your-domain.com -R |
Reload Nginx for the changes to take effect.
|
1 |
sudo systemctl reload nginx |
Once virtual host is created and enabled, run the following command to obtain and install Let’s Encrypt certificate with Nginx plugin.
|
1 |
sudo certbot --nginx --agree-tos --redirect --hsts --email your-email-address -d mail.your-domain.com |
You should see the following which means the certificate is successfully obtained. You can also see the directory under which your cert is stored.

Configuring Postfix
To send emails from a desktop email client, we need to enable the submission service of Postfix so that the email client can submit emails to Postfix SMTP server. Edit the master.cf file.
|
1 |
sudo nano /etc/postfix/master.cf |
In submission section, uncomment or add the following lines. Please allow at least one whitespace (tab or spacebar) before -o. In postfix configurations, a preceding whitespace character means that this line is continuation of the previous line. (By default the submission section is commented out. You can copy the following lines and paste them into the file, so you don’t have to manually uncomment or add new text.)
|
1 2 3 4 5 6 7 8 9 |
submission inet n - y - - smtpd -o syslog_name=postfix/submission -o smtpd_tls_security_level=encrypt -o smtpd_tls_wrappermode=no -o smtpd_sasl_auth_enable=yes -o smtpd_relay_restrictions=permit_sasl_authenticated,reject -o smtpd_recipient_restrictions=permit_mynetworks,permit_sasl_authenticated,reject -o smtpd_sasl_type=dovecot -o smtpd_sasl_path=private/auth |
The above configuration enables the submission daemon of Postfix and requires TLS encryption. So later on our desktop email client can connect to the submission daemon in TLS. The submission daemon listens on TCP port 587. STARTTLS is used to encrypt communications between email client and the submission daemon.
Save and close the file. Next, we need to let Postfix know where TLS certificate and private key are. Edit main.cf file.
|
1 |
sudo nano /etc/postfix/main.cf |
Edit the TLS parameter as follows:
|
1 2 3 4 5 6 7 8 9 10 |
smtpd_tls_cert_file=/etc/letsencrypt/live/mail.your-domain.com/fullchain.pem smtpd_tls_key_file=/etc/letsencrypt/live/mail.your-domain.com/privkey.pem smtpd_tls_security_level=may smtpd_tls_protocols = !SSLv2, !SSLv3 !TLSv1 smtpd_tls_loglevel = 1 smtpd_tls_session_cache_database = btree:${data_directory}/smtpd_scache smtp_tls_security_level = may smtp_tls_loglevel = 1 smtp_tls_session_cache_database = btree:${data_directory}/smtp_scache |
Your Let’s Encrypt certificate and private key are stored under /etc/letsencrypt/live/mail.your-domain.com/ directory. Save and close the file. Then reload Postfix.
|
1 |
sudo postfix reload |
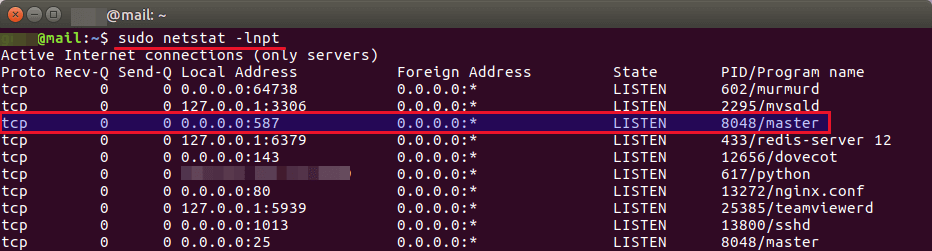
If you run the following command, you will see port 587 is now open.
|
1 |
sudo netstat -lnpt |
Installing Dovecot IMAP Server
Enter the following command to install Dovecot core package and the IMAP daemon package on Ubuntu server.
|
1 |
sudo apt install dovecot-core dovecot-imapd |
Check Dovecot version:
|
1 |
sudo dovecot --version |
Sample output:
|
1 |
2.2.22 (fe789d2) |
Configuring Dovecot
First, edit main config file.
|
1 |
sudo nano /etc/dovecot/dovecot.conf |
Add the following line to enable IMAP protocol.
|
1 |
protocols = imap |
Configuring Mailbox Location
By default, Postfix uses mbox format to store emails. Each user’s emails is stored in a single file /var/mail/username. You can run the following command to find the mail spool directory.
|
1 |
postconf mail_spool_directory |
Sample output:
|
1 |
mail_spool_directory = /var/mail |
The config file for mailbox location is /etc/dovecot/conf.d/10-mail.conf.
|
1 |
sudo nano /etc/dovecot/conf.d/10-mail.conf |
The default configuration is as follows, which is fine for a small email server.
|
1 |
mail_location = mbox:~/mail:INBOX=/var/mail/%u |
We need to add the following line in the file. (On Ubuntu 18.04, this line is already in the file.)
|
1 |
mail_privileged_group = mail |
After that, add dovecot to the mail group so that Dovecot can read the INBOX.
|
1 |
sudo gpasswd -a dovecot mail |
Configuring Authentication Mechanism
Edit the authentication config file.
|
1 |
sudo nano /etc/dovecot/conf.d/10-auth.conf |
Uncomment the following line.
|
1 |
disable_plaintext_auth = yes |
It will disable plaintext authentication when there’s no SSL/TLS encryption. And if you want to use full email address (username@your-domain.com) to login, add the following line in the file.
|
1 |
auth_username_format = %n |
Otherwise you are able to login with username only (without @your-domain.com). Next, find the following line.
|
1 |
auth_mechanisms = plain |
This line only enables the PLAIN authentication mechanism. LOGIN is another common authentication mechanism you probably want to add.
|
1 |
auth_mechanisms = plain login |
Configuring SSL/TLS Encryption
Next, edit SSL/TLS config file.
|
1 |
sudo nano /etc/dovecot/conf.d/10-ssl.conf |
Change ssl = no to ssl = required.
|
1 |
ssl = required |
Then specify the location of your SSL/TLS cert and private key. Don’t leave out < character. It’s necessary.
|
1 2 |
ssl_cert = </etc/letsencrypt/live/mail.your-domain.com/fullchain.pem ssl_key = </etc/letsencrypt/live/mail.your-domain.com/privkey.pem |
SASL Authentication Between Postfix and Dovecot
Edit the following file.
|
1 |
sudo nano /etc/dovecot/conf.d/10-master.conf |
Change service auth section to the following so that Postfix can find the Dovecot authentication server.
|
1 2 3 4 5 6 7 |
service auth { unix_listener /var/spool/postfix/private/auth { mode = 0660 user = postfix group = postfix } } |
Auto-create Sent and Trash Folder
Edit the below config file.
|
1 |
sudo nano /etc/dovecot/conf.d/15-mailboxes.conf |
To auto create a folder, simply add the following line in the mailbox section.
|
1 |
auto = create |
Example:
|
1 2 3 4 |
mailbox Trash { auto = create special_use = \Trash } |
Some common folders you will want to create includes: Drafts, Junk, Trash and Sent. These folders will be created at the user’s home directory. After you save and close all above config files, restart Dovecot.
|
1 |
sudo systemctl restart dovecot |
Dovecot will be listening on port 143 (IMAP) and 993 (IMAPS). If there’s a configuration error, dovecot will fail to restart. We also need to restart Postfix to allow the LOGIN authentication mechanism.
|
1 |
sudo systemctl restart postfix |
Configure Desktop Email Client
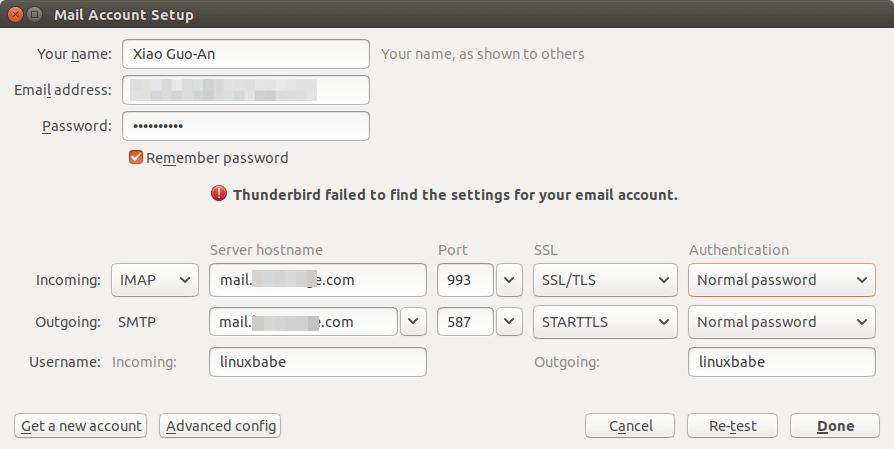
Now open up your desktop email client such as Mozilla Thunderbird and add a mail account.
- In the incoming server section, select IMAP protocol, enter
mail.your-domain.comas the server name, choose port 993 and SSL/TLS. Choosenormal passwordas the authentication method. - In the outgoing section, select SMTP protocol, enter
mail.your-domain.comas the server name, choose port 587 and STARTTLS. Choosenormal passwordas the authentication method.
You should now be able to connect to your own email server and also send and receive emails with your desktop email client!
Using Dovecot to Deliver Email to Message Store
By default, Postfix uses its builtin local delivery agent (LDA) to move inbound emails to the message store (inbox, sent, trash, Junk, etc). We can configure it to use Dovecot to deliver emails, via the LMTP protocol, which is a simplified version of SMTP. LMTP allows for a highly scalable and reliable mail system. This step is required if you want to use the sieve plugin to filter inbound messages to different folders.
Install the Dovecot LMTP Server.
|
1 |
sudo apt install dovecot-lmtpd |
Edit the Dovecot main configuration file.
|
1 |
sudo nano /etc/dovecot/dovecot.conf |
Add lmtp to the supported protocols.
|
1 |
protocols = imap lmtp |
Save and close the file. Then edit the Dovecot 10-master.conf file.
|
1 |
sudo nano /etc/dovecot/conf.d/10-master.conf |
Change the lmtp service definition to the following.
|
1 2 3 4 5 6 7 |
service lmtp { unix_listener /var/spool/postfix/private/dovecot-lmtp { group = postfix mode = 0600 user = postfix } } |
Next, edit the Postfix main configuration file.
|
1 |
sudo nano /etc/postfix/main.cf |
Add the following lines at the end of the file. The first line tells Postfix to deliver emails to local message store via the dovecot LMTP server. The second line disables SMTPUTF8 in Postfix, because Dovecot-LMTP doesn’t support this email extension.
|
1 2 |
mailbox_transport = lmtp:unix:private/dovecot-lmtp smtputf8_enable = no |
Save and close the file. Finally, restart Postfix and Dovecot.
|
1 |
sudo systemctl restart postfix dovecot |
Wrapping Up
I hope this article helped you set up Postfix and Dovecot on Ubuntu server. In part 3, I will show you how to set up SPF and DKIM with Postfix to improve email deliverability. If you want to access emails via Webmail, then I recommend RainLoop Webmail, which is lightweight, fast and has a modern interface. Roundcube is also a popular open source webmail client.
转载至:How to Install Dovecot IMAP server on Ubuntu and Enable TLS Encryption