
文章目录
- 1 What are SPF and DKIM Records?
- 2 Create an SPF Record in DNS
- 3 Configuring SPF Policy Agent
- 4 Setting up DKIM
- 5 Create Signing Table, Key Table and Trusted Hosts File
- 6 Generate Private/Public Keypair
- 7 Add Public Key in DNS Records
- 8 Test your configuration
- 9 Connect Postfix to OpenDKIM
- 10 SPF and DKIM Check
- 11 The Struggle with Microsoft Mailboxes
After completing part 1 and part 2, we have a working Postfix SMTP server and Dovecot IMAP server. We can send and receive email using a desktop email client. Although I have correct MX, A and PTR record, my emails were flagged as spam by Gmail and Outlook mail. So in part 3, we are going to look at how to improve email delivery to recipient’s inbox by setting up SPF and DKIM on Ubuntu server.
What are SPF and DKIM Records?
SPF and DKIM are two types of TXT records in DNS that can help prevent email spoofing and ensure legitimate emails are delivered into the recipient’s inbox instead of spam folder. If your domain is abused by email spoofing, then your emails are likely to landed in recipient’s spam folder if they didn’t add you in address book.
SPF (Sender Policy Framework) record specifies which hosts or IP addresses are allowed to send emails on behalf of a domain. You should allow only your own email server or your ISP’s server to send emails for your domain.
DKIM (DomainKeys Identified Mail) uses a private key to add a signature to emails sent from your domain. Receiving SMTP servers verify the signature by using the corresponding public key, which is published in your DNS manager.
Create an SPF Record in DNS
In your DNS management interface, create a new TXT record like below.
1 | TXT @ v=spf1 mx ~all |

Explanation:
- TXT indicates this is a TXT record.
- Enter @ in the name field.
- v=spf1 indicates this is a SPF record and the SPF record version is SPF1.
- mx means all hosts listed in the MX records are allowed to send emails for your domain and all other hosts are disallowed.
- ~all indicates that emails from your domain should only come from hosts specified in the SPF record. Emails that are from other hosts will be flagged as forged. Possible alternatives are
+all,-all,?all, but they are rarely used.
Note that some DNS managers require you to wrap the SPF record with quotes like below.
1 | TXT @ "v=spf1 mx ~all" |
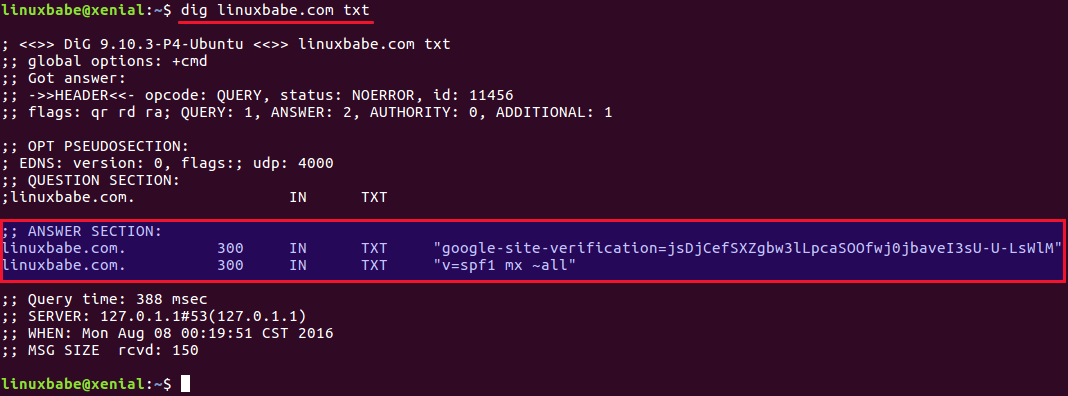
To check if your SPF record is propagated to the public Internet, you can use the dig utility on your Linux machine like below:
1 | dig your-domain.com txt |
The txt option tells dig that we only want to query TXT records.
You can also use online SPF validator such as spf.myisp.ch to see which hosts are allowed to send emails for your domain and debug your SPF record if any error occurs. The dmarcian SPF surveyor can help test your SPF record syntax.
Configuring SPF Policy Agent
We also need to tell our Postfix SMTP server to check for SPF record of incoming emails. This doesn’t help ensure outgoing email delivery but help with detecting forged incoming emails.
First install required packages:
1 | sudo apt install postfix-policyd-spf-python |
Then edit the Postfix master process configuration file.
1 | sudo nano /etc/postfix/master.cf |
Add the following lines at the end of the file, which tells Postfix to start the SPF policy daemon when it’s starting itself.
1 2 | policyd-spf unix - n n - 0 spawn user=policyd-spf argv=/usr/bin/policyd-spf |
Save and close the file. Next, edit Postfix main configuration file.
1 | sudo nano /etc/postfix/main.cf |
Append the following lines at the end of the file. The first line specifies the Postfix policy agent timeout setting. The following lines will impose restriction on incoming emails by rejecting unauthorized email and checking SPF record.
1 2 3 4 5 6 | policyd-spf_time_limit = 3600 smtpd_recipient_restrictions = permit_mynetworks, permit_sasl_authenticated, reject_unauth_destination, check_policy_service unix:private/policyd-spf |
Save and close the file. Then restart Postfix.
1 | sudo service postfix restart |
or
1 | sudo systemctl restart postfix |
Next time, when you receive an email from a domain that has an SPF record, you can see the SPF check results in the raw email header. The following header indicates a successful check against SPF.
1 | Received-SPF: Pass (sender SPF authorized). |
Setting up DKIM
First install OpenDKIM which is an open source implementation of the DKIM sender authentication system.
1 | sudo apt install opendkim opendkim-tools |
Then add postfix user to opendkim group.
1 | sudo gpasswd -a postfix opendkim |
Edit OpenDKIM main configuration file.
1 | sudo nano /etc/opendkim.conf |
Uncomment the following lines. Replace simple with relaxed/simple.
1 2 3 | Canonicalization simple Mode sv SubDomains no |
Then add the following lines below #ADSPAction continue line. If your file doesn’t have #ADSPAction continue line, then just add them below SubDomains no.
1 2 3 4 5 | AutoRestart yes AutoRestartRate 10/1M Background yes DNSTimeout 5 SignatureAlgorithm rsa-sha256 |
Add the following lines at the end of this file. (On Ubuntu 18.04, the UserID is already set to opendkim)
1 2 3 4 5 6 7 8 9 10 11 12 13 | #OpenDKIM user # Remember to add user postfix to group opendkim UserID opendkim # Map domains in From addresses to keys used to sign messages KeyTable refile:/etc/opendkim/key.table SigningTable refile:/etc/opendkim/signing.table # Hosts to ignore when verifying signatures ExternalIgnoreList /etc/opendkim/trusted.hosts # A set of internal hosts whose mail should be signed InternalHosts /etc/opendkim/trusted.hosts |
The final configuration file is as follows:
1 2 3 4 5 6 7 8 9 10 11 12 13 14 15 16 17 18 19 20 21 22 23 24 25 26 27 28 29 30 31 32 33 34 35 36 37 38 39 40 41 42 43 44 45 46 47 48 49 50 51 52 | # This is a basic configuration that can easily be adapted to suit a standard # installation. For more advanced options, see opendkim.conf(5) and/or # /usr/share/doc/opendkim/examples/opendkim.conf.sample. # Log to syslog Syslog yes # Required to use local socket with MTAs that access the socket as a non- # privileged user (e.g. Postfix) UMask 002 # Sign for example.com with key in /etc/mail/dkim.key using # selector '2007' (e.g. 2007._domainkey.example.com) #Domain example.com #KeyFile /etc/mail/dkim.key #Selector 2007 # Commonly-used options; the commented-out versions show the defaults. Canonicalization relaxed/simple Mode sv SubDomains no #ADSPAction continue AutoRestart yes AutoRestartRate 10/1M Background yes DNSTimeout 5 SignatureAlgorithm rsa-sha256 # Always oversign From (sign using actual From and a null From to prevent # malicious signatures header fields (From and/or others) between the signer # and the verifier. From is oversigned by default in the Debian pacakge # because it is often the identity key used by reputation systems and thus # somewhat security sensitive. OversignHeaders From # List domains to use for RFC 6541 DKIM Authorized Third-Party Signatures # (ATPS) (experimental) #ATPSDomains example.com #OpenDKIM user # Remember to add user postfix to group opendkim UserID opendkim # Map domains in From addresses to keys used to sign messages KeyTable refile:/etc/opendkim/key.table SigningTable refile:/etc/opendkim/signing.table # Hosts to ignore when verifying signatures ExternalIgnoreList /etc/opendkim/trusted.hosts # A set of internal hosts whose mail should be signed InternalHosts /etc/opendkim/trusted.hosts |
Save and close the file.
Create Signing Table, Key Table and Trusted Hosts File
Create a directory structure for OpenDKIM
1 2 3 | sudo mkdir /etc/opendkim sudo mkdir /etc/opendkim/keys |
Change owner from root to opendkim and make sure only opendkim user can read and write to the keys directory.
1 2 3 | sudo chown -R opendkim:opendkim /etc/opendkim sudo chmod go-rw /etc/opendkim/keys |
Create the signing table.
1 | sudo nano /etc/opendkim/signing.table |
Add this line to the file.
1 | *@your-domain.com default._domainkey.your-domain.com |
Save and close the file. Then create the key table.
1 | sudo nano /etc/opendkim/key.table |
Add the following line.
1 | default._domainkey.your-domain.com your-domain.com:default:/etc/opendkim/keys/your-domain.com/default.private |
Save and close the file. Next, create the trusted hosts file.
1 | sudo nano /etc/opendkim/trusted.hosts |
Add the following lines to the newly created file.
1 2 3 4 | 127.0.0.1 localhost *.your-domain.com |
The above means that messages coming from the above IP addresses and domains will be trusted and signed.
Generate Private/Public Keypair
Since DKIM is used to sign outgoing messages and verify incoming messages, we need to generate a private key for signing and a public key for remote verifier. Public key will be published in DNS.
Create a separate folder for the domain.
1 | sudo mkdir /etc/opendkim/keys/your-domain.com |
Generate keys using opendkim-genkey tool.
1 | sudo opendkim-genkey -b 2048 -d your-domain.com -D /etc/opendkim/keys/your-domain.com -s default -v |
The above command will create 2048 bits keys. -d (domain) specifies the domain. -D (directory) specifies the directory where the keys will be stored and we use default as the selector (-s), also known as the name. Once the command is executed, the private key will be default.private and default.txt will be the TXT record that contains public key.
Make opendkim as the owner of the private key.
1 | sudo chown opendkim:opendkim /etc/opendkim/keys/your-domain.com/default.private |
Add Public Key in DNS Records
Display the public key
1 | sudo cat /etc/opendkim/keys/your-domain.com/default.txt |
The string after the p parameter is the public key.
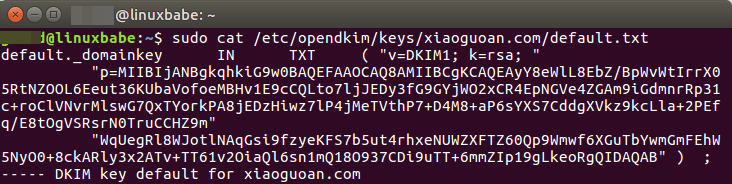
In you DNS manager, create a TXT record, enter default._domainkey in the name field. Then copy everything in the parentheses and paste it into the value field. Delete all double quotes and white spaces. If you don’t delete them, then the key test in the next step will fail.

Test your configuration
Enter the following command on Ubuntu 16.04 server to test your key.
1 | sudo opendkim-testkey -d your-domain.com -s default -vvv |
If everything is OK, you will see
1 | key OK |
Connect Postfix to OpenDKIM
Postfix can talk to OpenDKIM via a Unix socket file. The default socket file used by OpenDKIM is /var/run/opendkim/opendkim.sock. But the postfix SMTP daemon shipped with Ubuntu runs in a chroot jail, which means that the SMTP daemon resolves all filenames relative to the Postfix queue directory (/var/spool/postfix). So we need to change the socket file.
Create a directory to hold the OpenDKIM socket file and only allow opendkim user and postfix group to access it.
1 2 3 | sudo mkdir /var/spool/postfix/opendkim sudo chown opendkim:postfix /var/spool/postfix/opendkim |
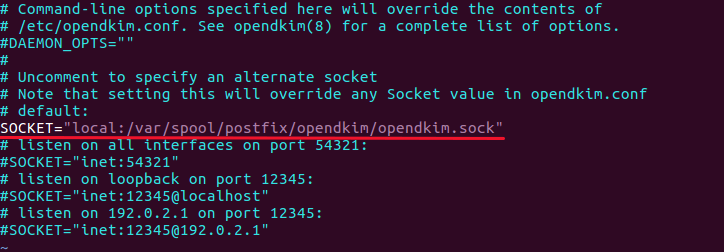
Then edit the socket configuration file.
1 | sudo nano /etc/default/opendkim |
Find the following line:
1 | SOCKET="local:/var/run/opendkim/opendkim.sock" |
Replace it with:
1 | SOCKET="local:/var/spool/postfix/opendkim/opendkim.sock" |
Save and close the file.
Note: On Ubuntu 18.04, the opendkim systemd service doesn’t use /etc/default/opendkim file. You need to change the socket file in /etc/opendkim.conf file.
1 | sudo nano /etc/opendkim.conf |
Find the following line:
1 | Socket local:/var/run/opendkim/opendkim.sock |
Replace it with:
1 | Socket local:/var/spool/postfix/opendkim/opendkim.sock |
Next, we need to edit Postfix main configuration file.
1 | sudo nano /etc/postfix/main.cf |
Add the following lines after smtpd_recipient_restriction section.
1 2 3 4 5 | # Milter configuration milter_default_action = accept milter_protocol = 6 smtpd_milters = local:/opendkim/opendkim.sock non_smtpd_milters = $smtpd_milters |
Save and close the file. Then restart opendkim and postfix service.
1 2 3 | sudo service opendkim restart sudo service postfix restart |
or
1 2 3 | sudo systemctl restart opendkim sudo systemctl restart postfix |
SPF and DKIM Check
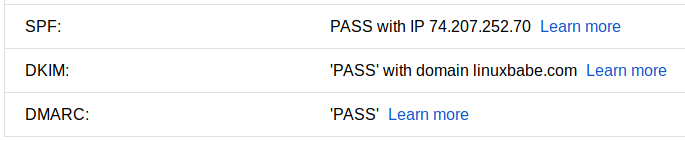
Now you can use your desktop email client or webmail client to send a test email to check-auth@verifier.port25.com and get a free email authentication report. Here’s the report I got from port25.com
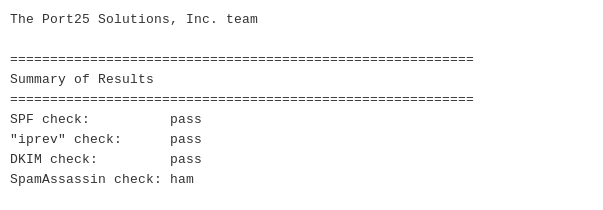
You can see that my email passed both SPF and DKIM check. iprev check is used to see if the reverse (IP to hostname) and forward (hostname to IP) lookup results were returned and were in agreement. Ham is a terminology used by Apache SpamAssassin to indicate that this is not spam.
You can also send a test email to your Gmail account to see if SPF and DKIM checks are passed. On the right side of an opened email message in Gmail, if you click the show original button from the drop-down menu, you can see the authentication results.
If your message is not signed and DKIM check failed, you may want to check postfix log (/var/log/mail.log) to see what’s wrong in your configuration. If you see the following message in the mail log, you may want to check if the opendkim systemd service is actually running.
1 | warning: connect to Milter service local:opendkim/opendkim.sock: No such file or directory |
If opendkim is running and you still see the above error, you might need to change smtpd_milters = local:/opendkim/opendkim.sock to smtpd_milters = local:opendkim/opendkim.sock in /etc/postfix/main.cf file.
Your email server will also perform SPF and DKIM check on sender’s domain. You can see the results in the email headers. The following is SPF and DKIM check on a sender using Gmail.
1 2 3 4 | Received-SPF: Pass (mailfrom) identity=mailfrom; client-ip=2607:f8b0:4864:20::c2d; helo=mail-yw1-xc2d.google.com; envelope-from=someone@gmail.com; receiver=<UNKNOWN> Authentication-Results: email.linuxbabe.com; dkim=pass (2048-bit key; unprotected) header.d=gmail.com header.i=@gmail.com header.b="XWMRd2co"; dkim-atps=neutral |
The Struggle with Microsoft Mailboxes
In my test, the email landed in my Gmail inbox. However, it’s stilled labeled as spam in my outlook.com email although both SPF and DKIM are passed. Microsoft seems to be using an internal blacklist that block many legitimate IP addresses. If your emails are rejected by outlook or hotmail, you need to submit the sender information form. After that, your email will be accepted by outlook/hotmail, but may still be labeled as spam.
In part 4, we will see how to create DMARC record to protect your domain from email spoofing. As always, if you found this post useful, please subscribe to our free newsletter or follow us on Google+, Twitter or like our Facebook page
转载至:How to Set up SPF and DKIM with Postfix on Ubuntu Server